

4 Halloween Nail Ideas You’ll Want to Save: Orange, Purple, Last Minute and Terracotta Tortoiseshell
Be honest with me. Have you already scrolled through a hundred Halloween nail photos this month and still have no idea what to book?
That happens to almost everyone. Every year, the same designs float around. Black cats, plain skeletons, and that same glittery pumpkin show up everywhere. Then you look at your own bare nails and think, “Is my style already behind?”
Here is the good news. This year, Halloween nails got a lot more interesting. The trend is moving away from loud cartoon looks and toward rich color, glossy texture, and small details that look expensive. For example, people are wearing orange Halloween nails that feel warm and cozy instead of neon. Meanwhile, purple Halloween nails are turning up moody and a little mysterious. And there is one earthy design that almost nobody in your circle has tried yet.
So in this post, I’m sharing four ideas I would actually wear. One is orange, and one is purple. Another is made for last minute Halloween nails, for those “the party is tonight” moments. Finally, the last one is a terracotta tortoiseshell look that I think will surprise you.
Stick with me until the end, because the fourth idea is the one people save the most. I’ll tell you why a little later.
What Makes Halloween Nails Look Modern in 2026
Here is a quick secret. The best Halloween nails right now are not about adding more stuff. Instead, they are about picking one strong color and doing it well.
Think about it. When a nail set makes you stop scrolling, what do you notice first? Usually it’s the color. After that comes the shine, and then one tiny detail that makes the whole set feel finished.
Because of this, I’ll show you three things for every idea below:
- The color and how it feels
- The finish, meaning shiny, soft matte, or something in between
- One small detail that makes it look planned
Ready? Let’s start with the color that says fall the loudest.
1. Orange Halloween Nails: Warm, Glowy, and Not Childish
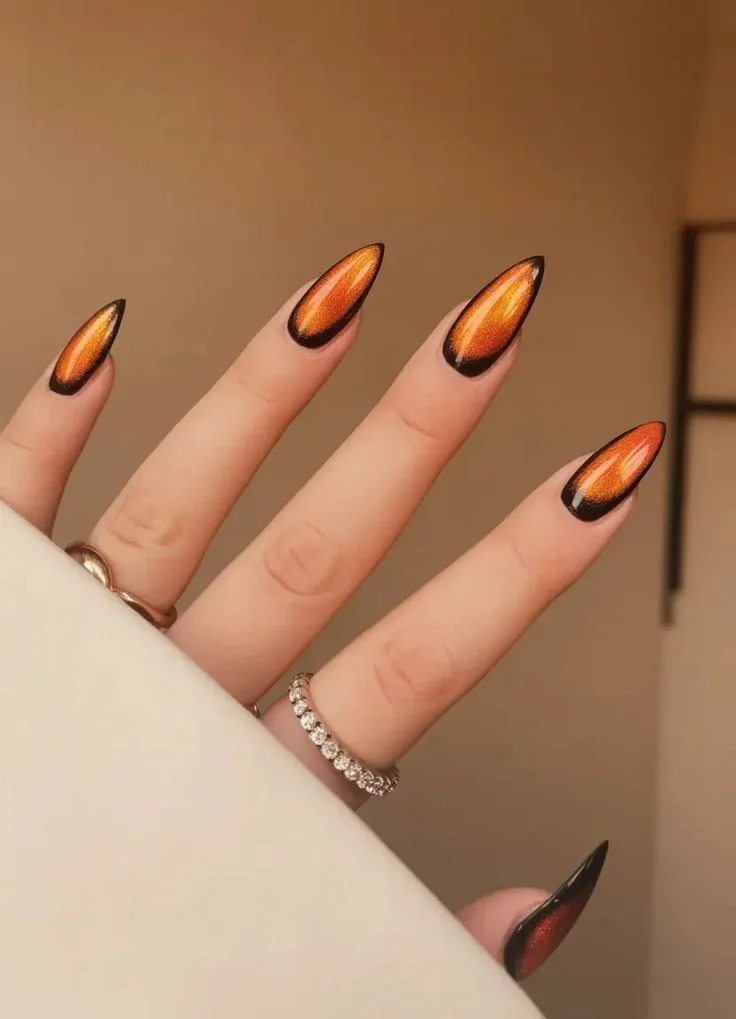
Let me guess what you are thinking. “Orange nails? Won’t that look like a pumpkin costume?”
I get it. In fact, I used to think the same thing. However, orange Halloween nails can look soft, grown up, and really pretty when you pick the right shade.
Pick the Right Orange
The trick is to skip the bright traffic cone orange. Look for burnt orange, rust orange, or a creamy apricot instead. These shades look warm against skin and feel like autumn light coming through a window. Plus, they flatter every skin tone, which is rare for a bold color.
How it looks: Picture a deep, glossy burnt orange on medium length almond nails. The color is smooth and rich, like a caramel apple with the sun on it. Now add one thin black line near the cuticle on your ring finger. That’s it. Nothing else is needed, yet it clearly says Halloween.
How it feels: Cozy, confident, and a little playful. It’s the kind of set that makes people ask, “Where did you get those done?”
Small Upgrades That Make It Special
Want to make it more fun? Try this mini upgrade. First, paint all your nails burnt orange. Then add a tiny black moon or a little spiderweb on just two nails. Two is enough, because small art keeps your nails looking styled instead of crowded.
So which finish works best for orange? Glossy is the easy winner. Orange has so much warmth that a shiny top coat makes it glow. A soft matte finish can look pretty too, but it works better on darker rust shades. If you go matte, add one glossy accent nail. That little shine contrast feels so fresh.
Ways to Wear It
Here are a few ways to wear orange Halloween nails, depending on your mood:
- Solid burnt orange with a glossy top coat for a clean, everyday look
- Orange with black French tips for something bolder
- Orange and cream swirls for a soft, dreamy pumpkin spice feel
- Orange chrome dust over a dark base for a glowing, candle like shine
Now here is a small tip most people skip. Always use a base coat with orange polish, since bright pigments can stain your natural nails and leave a yellow tint. One thin layer of base coat saves you from that.
Do you feel that little spark of “I could actually wear this”? Good. Keep that feeling, because next we are going darker.
2. Purple Halloween Nails: Moody, Magical, and Very Hard to Ignore
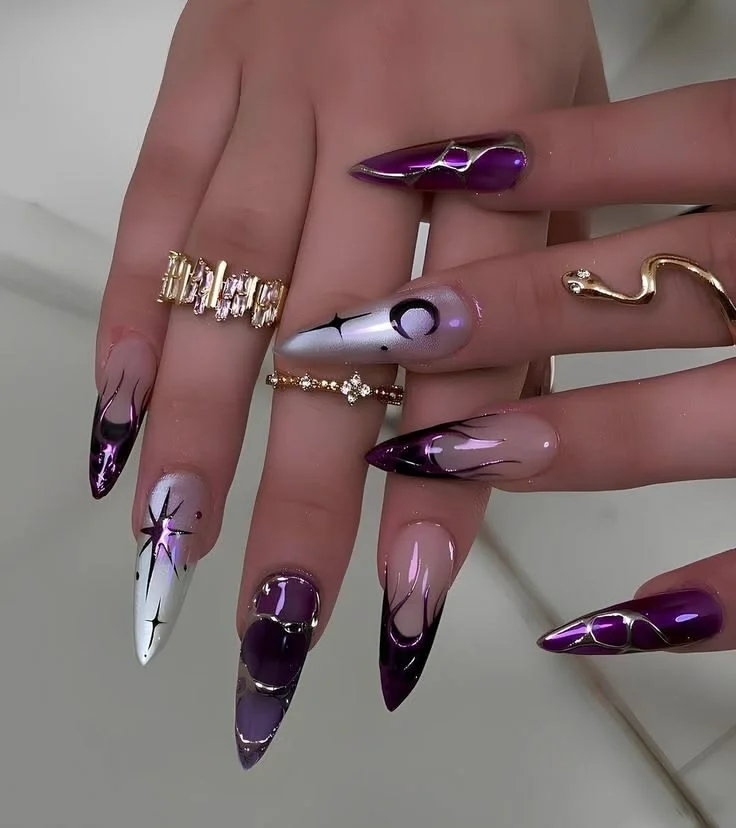
If orange is the cozy friend, purple is the mysterious one. Honestly, I think purple Halloween nails are the most underrated choice of the season.
Why? Because purple sits right between spooky and pretty. It gives you that witchy feeling without going full black. Better still, it looks amazing with almost any outfit, from an oversized sweater to a black party dress.
Choose Your Purple Shade
Let’s talk shades. You have a few great paths:
- Deep plum for a rich, wine like look
- Dusty lavender for something soft and dreamy
- Electric violet for a bold, glowing pop
- Grape purple with a hint of blue for a night sky feeling
My favorite is a dark plum with a glossy finish and a thin line of silver shimmer at the tip. It looks like a midnight potion in a glass bottle. When the light hits it, there’s a slight glow that feels magical.
How it looks: Imagine short square nails in deep plum. On the middle finger, you scatter tiny silver stars like a night sky. Meanwhile, the rest stay solid. The design is simple, but the stars catch the eye every time your hand moves.
How it feels: Mysterious, elegant, and a little dramatic in the best way.
Here is a quick comparison to help you choose.
| Purple Shade | Mood | Best Finish | Best For |
|---|---|---|---|
| Deep plum | Elegant and mysterious | Glossy | Evening parties and date nights |
| Dusty lavender | Soft and dreamy | Creamy or milky | Daytime and cute outfits |
| Electric violet | Bold and playful | Shiny or chrome | Costume parties |
| Midnight grape | Dark and magical | Cat eye shimmer | Spooky photos and events |
Tricks That Make Purple Look Expensive
Now, do you want to know a small trick that makes purple look more expensive? Try a cat eye effect. It’s a magnetic polish that creates a shimmering line across the nail. When you use it with purple, it looks like a glowing crystal ball. All you need is a small magnet, and it takes about a minute per hand after you paint.
And if you like a gradient, try fading dark purple at the tips into a soft lilac near the base. The result looks like a sunset made just for witches.
Which shade caught your eye? Hold on to that choice for a second, because now I’m going to solve a problem I know you have.
3. Last Minute Halloween Nails: Look Amazing in 20 Minutes or Less
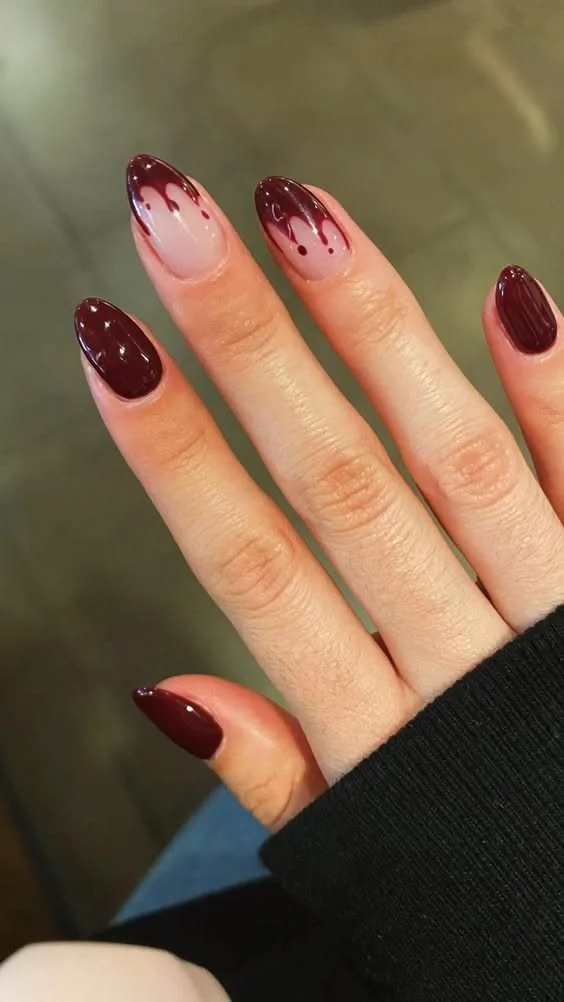
Picture this. It’s the afternoon of Halloween, and you have a party, a school event, or a dinner tonight. Then you look at your hands and realize you completely forgot about your nails.
Sound familiar? Don’t panic. This is exactly where last minute Halloween nails save the day.
The secret is simple. You don’t need a full nail art session. Instead, you need one smart move that looks planned.
Five Fast Ideas That Look Planned
The One Color Rule. Pick one polish, either black, orange, or deep purple, and paint every nail. Then add a thick glossy top coat. A perfectly painted, shiny nail always looks better than a messy design.
The Single Accent Nail. Paint everything one color first. After that, add a small detail to just one nail, like a sticker, a dot pattern, or a bit of glitter. Your eyes go straight to it, so the whole set feels styled.
The Black French Tip. Keep your nails bare or nude, and paint a neat black tip. To make it feel like Halloween, add a tiny orange dot below the line on one finger. It takes about ten minutes and looks sharp.
The Press On Trick. Grab a set of press on nails in a simple color and apply them. You’re done in fifteen minutes, with no drying time and no smudges. If you feel like it, add one small sticker on top.
The Glitter Fade. Paint your nails a dark color, then dab glitter polish at the tips with a small sponge. You get a soft, sparkly fade that looks like magic dust.
How Long Each Idea Really Takes
Since time is the whole issue here, let me show you how long each option takes so you can pick fast.
| Last Minute Idea | Time Needed | Difficulty | Halloween Feeling |
|---|---|---|---|
| One color with glossy top coat | 15 minutes | Very easy | Subtle and chic |
| Single accent nail | 20 minutes | Easy | Stylish and playful |
| Black French tip | 20 minutes | Medium | Sharp and bold |
| Press on nails | 15 minutes | Very easy | Depends on the design |
| Glitter fade | 20 minutes | Easy | Sparkly and fun |
The Real Secret to Last Minute Halloween Nails
Here is the real trick. It’s the top coat. A thick, glossy top coat makes even a simple manicure look like it came from a salon. So don’t rush that last step. Let each color layer dry for a minute or two, and then seal it well.
Also, if you smudge a nail, don’t start over. Just dab a bit of polish remover on a cotton swab and clean the edge. Then add a small sticker or glitter spot on top, and nobody will ever know it wasn’t planned.
See? Even on the busiest Halloween, your nails can look put together. Now for the surprise I promised.
4. Terracotta Tortoiseshell Nails: The Earthy Halloween Look Nobody Expects
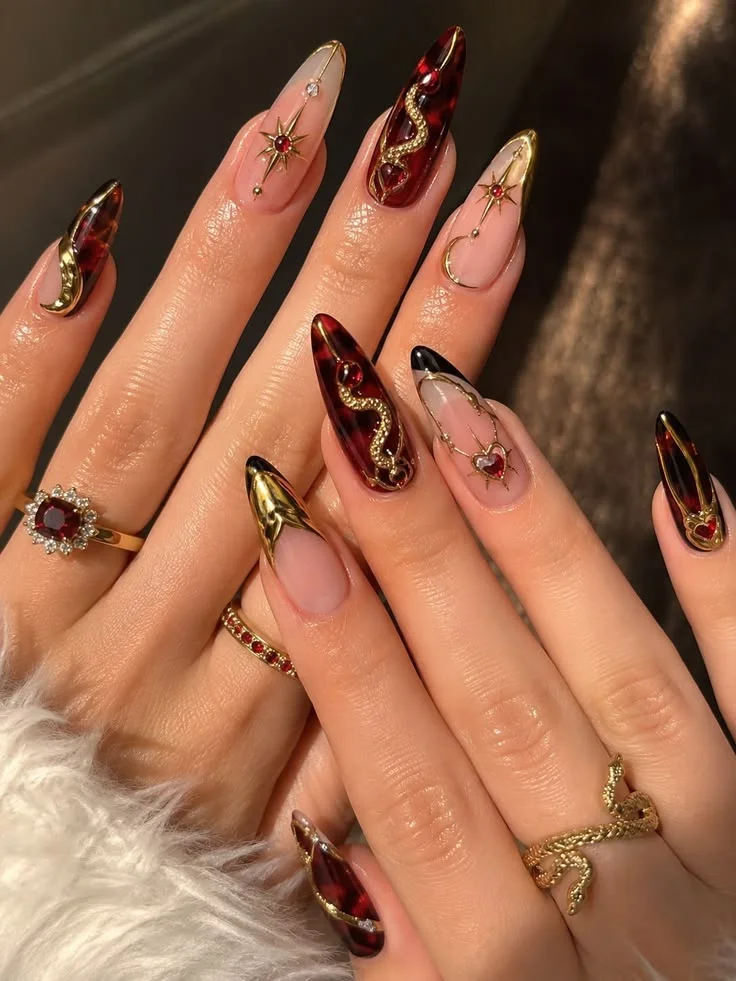
Okay, this is my favorite one. And I have a feeling it might become yours.
Have you ever seen a pair of tortoiseshell sunglasses? Those warm, swirly patterns in brown, amber, and gold are so pretty. Now imagine that on your nails, but in a rich, earthy terracotta shade. That is what terracotta tortoiseshell nails look like.
What Makes This Look Different
It’s not the usual Halloween idea. You won’t find bats or ghosts here. Instead, the design gives you the mood of Halloween through color. Think rusty, earthy, and a little witchy, like dried leaves, old clay pots, and candlelight.
How it looks: The base is a sheer, warm terracotta, like baked clay. On top, you add soft swirls of dark brown, amber, and a touch of black. Because the edges blend together, it looks like glass or honey. When light hits it, the layers seem to glow from inside.
How it feels: Rich, calm, and very put together. It looks like you have great taste without trying too hard.
How to Do It at Home
So how do you get this look? Here is a simple way to try it:
- Paint a sheer terracotta or rust colored base on all your nails.
- Dab small, uneven spots of dark brown polish on top, and do not make them perfect.
- Add a few amber or golden orange spots between the brown ones.
- Take a clean brush or sponge and gently blur the edges of the spots.
- Finish with a thick glossy top coat to create that glass like depth.
That’s really all it takes. The key is to keep the spots random. Real tortoiseshell has no pattern, so if it looks a little messy, that’s actually perfect.
Make It Feel Like Halloween
Wondering how to bring in the Halloween mood? Try one of these small touches:
- A tiny black moon or star on one nail
- A touch of gold foil near the cuticle
- Slightly darker tips for a spooky shadow effect
- A long almond or coffin shape for a dramatic finish
Why do I think this design will be everywhere soon? Because it fits so many moods. You can wear it to a Halloween party, and then keep it for pumpkin patch trips, coffee dates, and the whole fall season. In other words, it’s a Halloween nail idea that doesn’t scream “costume.” Instead, it says “I know what’s trending.”
Here’s a fun bonus, too. Terracotta tortoiseshell nails pair beautifully with the other ideas in this post. Try it on eight fingers, and then paint your two ring fingers in glossy plum or burnt orange. That mix is stunning.
Which Nail Idea Fits Your Halloween Plans?
Sometimes, picking one is the hard part. So here is a quick guide to help you decide.
| Nail Idea | Best Occasion | Vibe |
|---|---|---|
| Orange Halloween nails | Pumpkin patches, fall dates, casual parties | Warm and cozy |
| Purple Halloween nails | Night parties, dinners, photo shoots | Moody and magical |
| Last minute Halloween nails | Busy days, school events, surprise plans | Quick and stylish |
| Terracotta tortoiseshell nails | Everyday fall wear, office, Halloween week | Earthy and elegant |
If you’re still stuck, ask yourself one question. “How do I want to feel when I look down at my hands?” If you want cozy, go orange. For mysterious, go purple. When you’re rushed but want style, go last minute. And if you want calm and classy, go terracotta tortoiseshell.
Tips to Make Any Halloween Nail Set Last Longer
You put in the effort, so let’s protect it. Here are simple habits that help every design in this post.
- Push back your cuticles gently before you start
- Wipe your nails with alcohol so polish sticks better
- Apply thin layers, because thick coats stay soft and smudge
- Cap the free edge, which means painting the very tip of your nail
- Reapply top coat every two or three days to keep the shine
Small steps make a big difference. Better yet, they work whether you’re doing your nails at home or heading to a salon.
Your Halloween Nails Are Ready for the Spotlight
So, let’s wrap this up. You came here looking for Halloween nail ideas, and now you have four solid ones.
First, there are orange Halloween nails for a warm, glowing autumn look. Next, you have purple Halloween nails for something dramatic and magical. Then come last minute Halloween nails, for the days when time runs out but style shouldn’t. Finally, there are terracotta tortoiseshell nails, the earthy surprise that turns simple polish into something that looks like art.
Remember the question I asked at the start, about whether your style feels outdated? I hope you feel differently now. Halloween nails don’t need to be loud to be memorable. Just choose a color you love, add one thoughtful detail, and finish with plenty of shine. That’s how you get nails people notice.
Now I want to hear from you. Which idea are you trying first? Are you a burnt orange person, a deep plum person, or already planning your terracotta tortoiseshell set? Tell me in the comments, because I read every one.
And if this post gave you even one idea, save it to your Pinterest board so you can find it again when Halloween week gets busy. Your future self will be very glad you did.
The biggest trends are burnt orange nails, deep plum purple nails, last-minute designs you can do in 20 minutes or less, and terracotta tortoiseshell nails. The 2026 trend favors rich color, glossy texture, and one thoughtful detail over loud cartoon art.
Pick one smart move: paint all nails one color (black, orange, or deep purple) with a glossy top coat (15 min), add a single accent nail (20 min), do a black French tip (20 min), apply press-ons (15 min), or try a glitter fade (20 min). A thick glossy top coat is the real secret — it makes even simple polish look salon-done.
Push back cuticles gently, wipe nails with alcohol so polish adheres, apply thin layers (thick coats smudge), cap the free edge by painting the nail tip, and reapply top coat every 2-3 days. Always use a base coat with orange polish, since bright pigments can stain nails yellow.
Keep Reading: More Halloween Beauty Ideas
If you loved these ideas, see how Halloween nails got an upgrade with French tips and chrome. Pair your manicure with a gothic glam party makeup look.


